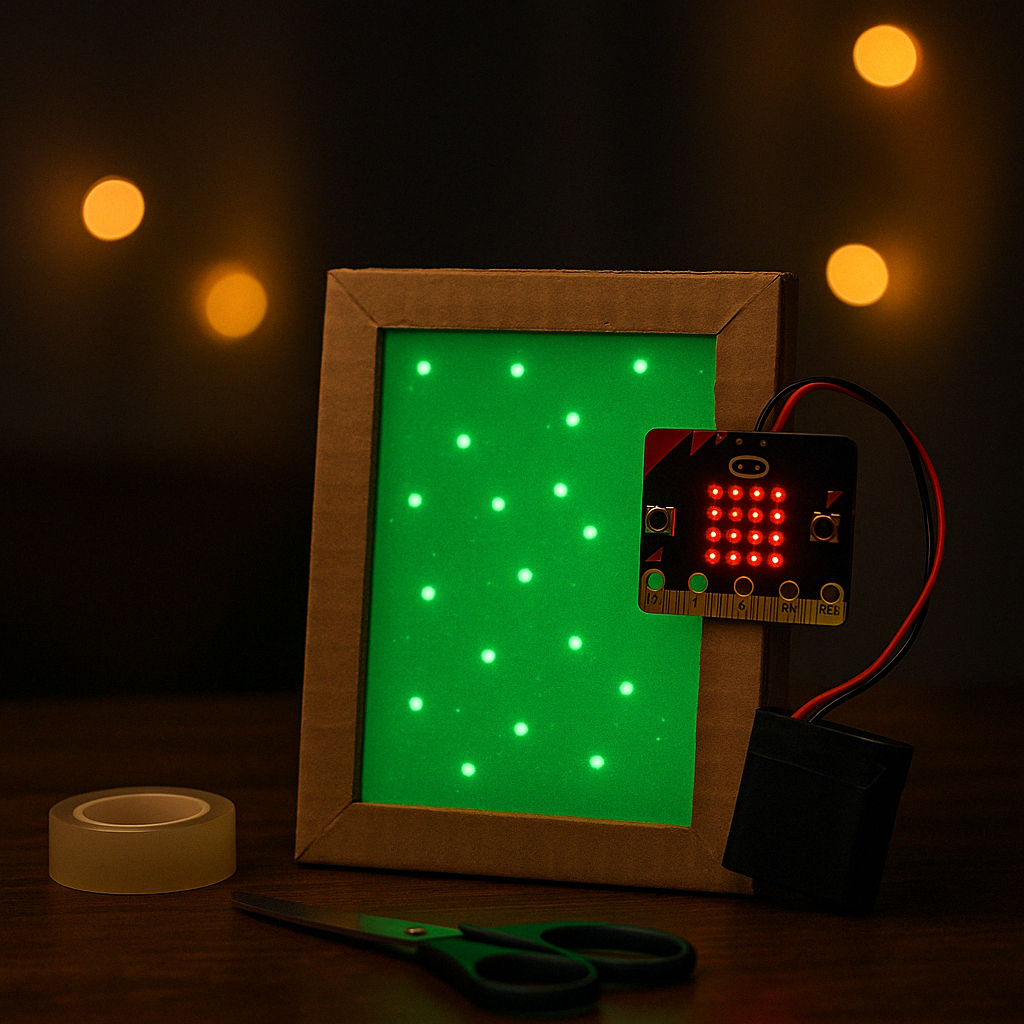
With this “Glowing Canvas,” the Micro:bit’s 5 × 5 LED matrix transforms from an ordinary display into a “light stamp.” Each LED flash leaves a temporary impression on the phosphorescent paper for several seconds; when your child shakes the board, a completely new pattern forms. This allows exploration of concepts like:
- Energy transfer (LED light → phosphorescent surface)
- Persistence & Decay (light slowly fading)
- Randomness & coding logic
All in one project, with low cost and zero soldering required.
Required Materials
| Qty | Material | Note |
|---|---|---|
| 1 | Micro:bit (V1 or V2) | USB cable included |
| 1 | AAA battery box (2-3 batteries) | For portability |
| 1 | A5 phosphorescent paper | Neon green glow-in-the-dark |
| 1 | A5 transparent PET sheet (0.5 mm) | Old folder cover works |
| 1 | Cardboard frame (A5 opening) | Ready-made or homemade |
| – | Double-sided tape & regular tape | For assembly |
| – | Scissors / craft knife, ruler | For cutting |
| – | Optional colored washi tape | Edge decoration |
Step-by-Step Assembly Guide
1. Prepare the Phosphorescent Layer (5 min)
- Cut the phosphorescent paper to A5 size.
- Cut the transparent PET sheet to the same size; attach it to the phosphorescent paper with double-sided tape. The PET disperses heat from the Micro:bit LEDs and protects the paper.
2. Create the Frame (10 min)
- If you have a ready-made cardboard frame, insert the phosphor-PET layer.
- If making your own: cut an 18 × 24 cm cardboard with a 14 × 21 cm window; tape the phosphorescent layer to the back. Decorate the edges with washi tape.
3. Mount the Micro:bit (5 min)
- Position the Micro:bit on the back of the frame with the LED face directly touching the phosphorescent paper.
- Use double-sided tape or velcro straps; adjust the frame for vertical/horizontal orientation.
- Secure the battery box on the back as well.
4. Upload the Code (15 min)
MakeCode → “New Project” → Switch to JavaScript view and enter:
function newPattern() {
    basic.clearScreen()
    for (let i = 0; i < 5; i++) {
        let x = randint(0, 4)
        let y = randint(0, 4)
        led.plot(x, y)
    }
}

input.onGesture(Gesture.Shake, function () {
    newPattern()
})

basic.forever(function () {
    // LEDs flash briefly once per second
    basic.pause(1000)
    basic.toggleLed(2, 2) // center LED flashes
})
// Initial pattern
newPattern()
* How It Works:
- At startup and each shake gesture, 5 random LEDs light up.
- LED flashes “charge” the phosphorescent surface; the pattern slowly fades over 5-10 seconds.
5. Test & Adjust (10 min)
- Dim the room.
- The first flash should create an LED pattern on the phosphorescent paper that slowly fades.
- Shake the board; a new “star map” will appear.
- If the pattern is faint, hold the frame 30 cm away from the wall, increase LED brightness with led.setBrightness(255).
6. Decoration and Usage (5 min)
- Decorate the frame edges with glow-in-the-dark paint or stickers.
- Record the interaction with the lights off; slow-motion video gives interesting results.
How It Works
LED light pushes the pigments in the phosphorescent surface to a higher energy level temporarily. Even after the light source is removed, the pigments release this energy as photons; this is called phosphorescence. Watching this micro-level “charge-discharge” cycle in real-time helps children intuitively understand energy storage and emission concepts.
Development Ideas
- Timer Mode: Instead of shake, use A button → random pattern, B button → dot clock showing time.
- Colored Phosphor Sheet: Add RGB LED strip (9-12V) to create different colored “stamps.”
- Data Logging: Record each random coordinate to a free EEPROM module and create a “most popular star” heat map.
Safety & Pedagogical Tips
- Use cutting tools under adult supervision; children 7-9 years old can actively participate in drawing lines and applying tape.
- For eye health, don’t run LEDs continuously at 255 brightness if sufficient; setBrightness(128) is adequate for most phosphorescent papers.
- Discussion questions: “Why does the light slowly disappear?”, “Which LEDs fade faster?”, “Do you think real stars fade like this too?”
This Glowing Canvas, combining science, design, and coding that you’ll experience with your child, will bring a touch of aurora magic to your room. Now capture your glowing artwork and share it with the hashtag #GlowCanvas!
